Wednesday, July 22, 2009

Asparagus and Squash Quiche

A quiche is a perfect summer meal to impress your friends and family. It looks way harder than it is, and basically you can put whatever you want into it (read: whatever you have laying around that's about to go bad).

Start by making a pie crust. Yes, you can buy a premade one, but once you make your own, you'll realize that there's no point in employing pillsbury for this particular task. I have no pictures of this step, but the recipe I used involves one stick of cold butter cut into cubes, a cup and a quarter of flour (any will do, but I used whole wheat pastry flour), a pinch of salt (unless you're using salted butter), and a few tablespoons of ice-cold water. Keep in mind that if you use whole wheat, you'll probably need a bit more water. Throw the butter, the salt and the flour into your food processor and pulse until it looks like pea-sized clumps. If you have a fancy food processor that comes with a plastic S-blade, use it. At this point, dribble in a tablespoon of water at a time while pulsing just until the dough forms one ball. Now take it out, flatten it slightly, wrap it in plastic wrap (aka saran crap, at least in my family) and refrigerate it for at least an hour.

While your dough is chilling, cut up some veggies into bite-sized pieces and roast them with salt, pepper, and olive oil. I used asparagus and kabocha squash (because I love it so very much). When cooking asparagus, get rid of the tough bottom of the stem by grasping both ends lightly and bending until it breaks. That's the sweet spot. Also keep in mind different cooking times. For instance, squash takes considerably longer than asparagus to roast. Therefore I put it in first and added the asparagus later. Sorry for the lack of pictures of this step too. I was kind of wingin' it.

At this point, turn your oven down to 350F.

Now cut some cheese into 1/2-inch cubes. I used a combination of cave-aged Swiss gruyere and what is essentially monterey jack marbled with jamaican jerk spices (Beecher's No Woman from Seattle if you care) but, again, whatever you're tired of looking at in your fridge will work.


Oh look at that, there are my roasted veggies. Notice how I kept the asparagus tops separate. Stay tuned.


Remove your dough from the fridge and unwrap it. Place it on a lightly floured surface (I really really like a silpat to keep the dough from sticking) and roll it out gently to about a quarter-inch thickness. By the way, look how nice this picture turned out with the bokeh and everything! And that's just with a point-and-shoot camera. Too bad the dough is cracked though. That's how I figured out it needs a bit more moisture with whole wheat. See, I'm learning too!


Anyway, this is how your rolled-out dough will look. Stop periodically to make sure it's not sticking too badly. The crust should be big enough to overlap over the edges of a pie tin.


Or pie-rex if you will.


Gently lift the dough into the dish and cut off the really overhanging bits. Use these scraps to patch up any cracks or spots where there wasn't enough dough.


Artfully pinch the edges. It doesn't have to look too nice, but it wouldn't hurt either.


Throw your veggies (except the asparagus tops) into your pie crust and arrange so they're pretty level. Beat 6 eggs with salt, pepper, and a splash of milk and pour them over the veggies.


Uh, make that 8 eggs.


There, much better!


Now arrange the asparagus tops on top in a nice pattern and bake until the middle is set. It took me about 55 minutes, but check starting at about 35. You don't want the quiche to burn. If the top (or crust) looks like it's turning dark but the middle is still jiggly, cover it loosely with foil for the rest of the cooking process.


Serve hot, cold, or room-temp. It's all good! (This is room temperature).

Monday, July 13, 2009

What I can only describe as oil-poached shrimp

I was kind of going for a tapas theme last night and I needed something to go with my tortilla espanola (see previous post) so I decided to try a super-simple shrimp dish.

Defrost enough shrimp to pack into a cast-iron skillet in one layer. Then pat them dry.


Mince about 3 cloves of garlic and add them to about a quarter-inch of olive oil in the bottom of a cast-iron skillet. If you don't have one, use a smallish round vessel that can go in the oven. A pie-tin might even work. Throw the garlic and oil in a 400 degree oven until the oil is hot and the garlic is dancing around in it.


Take the pan out and arrange the shrimp in the oil. Add a pinch of salt and some crushed red pepper flakes.


Throw the pan back in the oven and cook until the critters are done, flipping them once halfway through cooking. It should only take about 5 minutes, but your mileage may vary. When the shrimps are completely pink and curled loosely (if they are tightly curled up, they may be overdone) they are perfect.


Serve straight from the skillet but use a trivet because the pan will stay hot for quite a while.

Tortilla Espanola

Tortilla Espanola (or Tortilla de Patata) is a spanish egg and potato dish. It is delicious and has 3 ingredients, not including salt and pepper. The cooking technique itself can be a bit tricky, and i have yet to perfect it, but even if it doesn't turn out perfectly, it's still delicious.

Peel 3 potatoes. Quarter them lengthwise then slice very thinly, as if you were to make potato chips (which essentially you are. Just wait!). Rinse them well in cold water. I like to use a salad spinner for this because you want to dry them well too. Rinsing off the starch will allow them to be crispier when fried.


Heat an inch or two of oil in a pan. Cast iron works well because it retains heat. I used grapeseed oil, but any oil with a high smoke point (peanut, vegetable, NOT olive) works. Fry the potatoes in small batches. The oil should bubble furiously when the potatoes are added.


When the potatoes are golden brown and delicious, remove them from the oil to a paper-towel-lined plate


While the potatoes are cooking, crack 8 eggs into a large mixing bowl and beat them. Add a generous pinch of salt and some black pepper.


Add the warm potatoes to the egg mixture and mix well.


Heat a good amount of oil in a nonstick skillet over medium/medium-high heat. It's convenient to just pour some of your potato-frying oil in the skillet if there are no burnt pieces in it. I used about a 10-inch skillet.


When the pan is hot, add the eggs and potatoes. The edges should start to set right away.


When all of the tortilla except the center is set, it's time to flip. Do this by placing a lid that is smaller than the skillet directly on top of the tortilla. Pour off the raw egg and oil into a plate.


Then flip the tortilla onto the lid and slide it back onto the skillet.


Made a well in the center of the tortilla and pour back in the liquid.


Allow to set for another minute or so then move to a serving plate. Unfortunately, I browned the first side a bit, but i think a slightly lower temperature would fix that for next time.


This tortilla espanola serves 4.

Tuesday, May 26, 2009

Leftovers Calzones

The other day, I roasted one of these. It's a kabocha squash; basically a pumpkin but sweeter.


This is what the insides look like.


After scooping out the seeds, I used a big, sharp knife to cut the squash into 1 inch cubes. One of the wonderful things about kabochas is that you don't have to peel them. The skin is quite tender once it's cooked.


Next, I tossed it with olive oil and a generous pinch of salt. Ordinarily I would add a ton of pepper too, but I was going to put the squash in some sushi rolls I was making, so I decided against it.


Next, I spread the cubes in a single layer on a foil-lined cookie sheet and roasted them for about half an hour at around 400 degrees. You are trying to achieve a soft consistency with some caramelization around the edges.


I had about half of the squash left over last night so I was thinking what I could make. I also had a store-bought ball of pizza dough, some goat cheese, and a handful of each parmesan and shredded mozzarella. Pizza seemed like the obvious choice, but since the ingredients I had were a little dry, I decided they'd be perfect for calzones. I also decided to use pesto instead of a red sauce.

I preheated the oven to 475. There are a couple of little-known secrets to homemade pizza with a good crust texture. The first is a very high temperature. Trust me. The second is, if you don't have a pizza stone (which I don't) and are using a cookie sheet, let it preheat in the oven. This will help brown the bottom of the pizza or calzone.

Then I took my premade pizza dough out of the fridge and laid it on a lightly floured surface to relax a bit. I like to make things from scratch, but pizza dough is one of the things I'm perfectly happy to buy premade. It's cheap, good, and saves a ton of work!


Then I started with the pesto. I made quite a small batch, since my basil plant needs to recover from the last time (it's looking a little bare). I threw a bunch of leaves into the food processor, a pinch of salt, 2 cloves of garlic, crushed, a handful of parmesan, a generous 1/2 teaspoon of pepper, and some olive oil. The amount of oil depends on how the texture is when you process it. If it's not moving well within the food processor, add a bit of oil. I'd wager I used about a 1/3 of a cup.


Next I cut the pizza dough into four pieces and put three of them aside. I rolled the first piece into a ball then started flattening it out. You can either roll it, pound it, or stretch it. It doesn't matter, as long as you don't futz with it too much or the gluten will go crazy and your dough will be so stretchy that it will bounce back no matter when shape you try to coax it into.


Once the dough was a flat round about the size of my hand with my fingers outstretched, I spread it with pesto, some squash, bits of goat cheese and a sprinkling of mozzarella. The pesto can go on the whole thing but the rest of the toppings should stick to one side. Also, leave a rim for the dough to stick together. Fold over one side and pinch the edges closed with a fork. You want a good seal so the filling doesn't leak out and burn to the cookie sheet. Place it on a sheet of foil.


Repeat with the other calzones. Now take the hot cookie sheet out of the hot oven and lift the foil with the calzones onto it. Get it back into the oven and bake. Mine took about 20 minutes. I also decided about halfway through that I wanted to sprinkle a bit of parmesan on top of the calzones.


Once the outside is slightly golden and the crust sounds a bit hollow when tapped, take them out of the oven.


Serve hot.

Thursday, May 21, 2009

Escarfaux

While I was waiting for an onion to caramelize (see previous post), I decided to make some escarfaux from a bag of leftover mushrooms in the fridge. They are essentially mushrooms in a butter-garlic sauce, similar to that of escargot. The recipe originally came from my favorite cookbook ever, Clueless in the Kitchen, but they were called "Mushrooms Masquerading as Escargot." I decided they needed a better name, so I came up with Escarfaux. Rather fetching, no?

The ingredients:


My oven was already preheating to 375, but if yours isn't, do it now. A toaster oven works well for this too, if you have a casserole dish that is small enough to fit in your toaster.

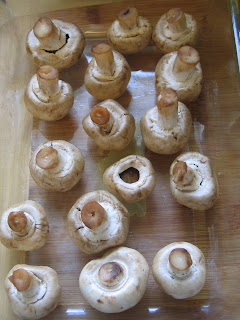
Wash a bunch of mushrooms and arrange them stem up in a casserole dish. Disregard the one that I accidentally broke the stem off of. Oops.


Now put half a stick of butter (or however much you have lying around, or a combination of butter and olive oil), a few cloves of garlic, minced, and a handful of parsley, chopped in a microwave safe bowl. I used a measuring cup because it has a spout, and it was clean. And i know for a fact that it's microwave safe.


Nuke it for 30 seconds to a minute, just until the butter is melted. It should smell amazing. If it doesn't, I can't help you.


Pour this mixture over the mushrooms, add a generous pinch of salt and a bunch of freshly ground pepper and throw it in the oven.


After about 15 minutes, or when the mushrooms are small, soft, and dark in color, take them out. At this point I put them in the dish I'd be serving them in, which in this case was a tupperware and poured the remaining sauce on top. If you're feeling saucy (get it?) you can drizzle them with a bit of a balsamic reduction (sounds complicated, but basically all it is is heating up a bit of balsamic vinegar in a sauce pan until it thickens up. It makes it sweeter) or a light squeeze of lemon juice.

Bruschetta with Caramelized Onions and Goat Cheese

I love making food that seems impressive but really took no effort whatsoever. This bruschetta falls under that heading. Bruschetta is basically toasty bread slathered with whatever you want. I had goat cheese so I decided to do a caramelized onion and goat cheese bruschetta. Very little effort is involved but it does take a while to caramelize the onions.

The ingredients


Preheat your oven to 375.

Peel and half an onion lengthwise. Slice it very thinly into crescents.


Heat a skillet to low heat and pour in enough olive oil to coat the bottom. Throw in the onion, making sure to separate the layers. Add salt and continue to cook until they get dark, being careful not to burn them. This will take quite a while, like over a half hour. Be patient.


Meanwhile, slice a baguette thinly. I do it at an angle because it's prettier and makes bigger pieces, but you can cut straight across too. It really makes no difference. I used a fresh seeded sourdough baguette, but it is my professional opinion that stale bread is why bruschetta was invented.


Place the slices on a cookie sheet and drizzle with some olive oil and sprinkle salt on them. Throw them in the oven. It doesn't have to be hot yet. Your aim is to dry out the bread and make it crispy, like a big crouton. Take them out of the oven when they seem crisp and very slightly golden.


When the onions are done, they'll have reduced a lot. At this point, place them on a cutting board and roughly chop them.


Slather as much or as little goat cheese on each slice of bread as you want. Grind some black pepper on, then add a little of the caramelized onion to each.


Toss back in the oven for a few minutes, until the cheese becomes melty. They are best hot, but I'm taking them to an opera rehearsal this evening so they'll be room temperature. They'll still be delicious though.